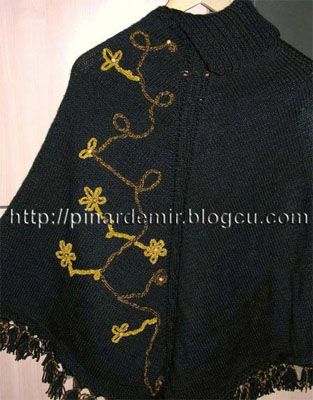
I love the versatility of a poncho, especially when it’s as elegant as this one. The top-down design is perfect for getting the right fit, and the eyelet details and embroidered finish make it a truly special project. I was going for a rounded shape, and I think I achieved it perfectly!
The Process
I knit this poncho from the top down, starting at the collar with a 10 cm ribbed stitch. For the body of the poncho, I used a cable pattern for a central panel of six stitches. I created a rounded, rather than triangular, shape by making eyelet increases on both sides of this central cable panel. I also added more subtle increases on the sides of the poncho to help it drape beautifully.
I continued this pattern of increasing until the poncho reached the length I wanted. I finished the body with 4 rows of garter stitch for a clean hem before binding off all the stitches. The final touch was adding long, hand-tied fringes to the hemline.
The Finishing Touch
The most enjoyable part of this project was the embroidery. Using colorful embroidery floss and my imagination, I created a beautiful design of flowers and patterns. I even added small wooden beads to the center of each flower to make them pop! This is where you can really let your creativity shine, decorating and embroidering as you wish to make it your own.